Yajurveda Upakarma 2023 marks the sacred renewal of vows for Brahmin males‚ emphasizing the study and transmission of Vedic knowledge. This ritual‚ observed on Shravana Purnima‚ involves changing the sacred thread and chanting specific mantras‚ guided by downloadable Tamil and Sanskrit PDF resources. It symbolizes a commitment to tradition and spiritual growth.
What is Upakarma?
Upakarma is a significant ritual in the Yajurveda tradition‚ observed by Brahmin males to renew their sacred thread (poonool) and reaffirm their commitment to Vedic studies. It marks the beginning of the study of the Yajurveda for the upcoming year and is performed on the full moon day of the Shravana month (Shravana Purnima). The ceremony involves chanting specific Vedic mantras‚ performing a ritual bath‚ and changing the sacred thread. This practice symbolizes spiritual renewal and adherence to tradition. The ritual is guided by detailed procedures outlined in downloadable PDF resources‚ available in both Tamil and Sanskrit‚ ensuring accessibility for all devotees.
Importance in Yajurveda Tradition
Upakarma holds profound significance in the Yajurveda tradition as a ritual of renewal and reaffirmation. It symbolizes the commitment to Vedic studies and the preservation of ancient knowledge. By renewing the sacred thread‚ individuals re-establish their connection to their heritage and spiritual lineage. The ceremony also serves as a reminder of the responsibilities associated with maintaining Vedic traditions. Additionally‚ Upakarma is seen as a means of spiritual cleansing and seeking divine blessings for the coming year. The availability of detailed PDF guides in Tamil and Sanskrit ensures that the rituals are performed accurately‚ making the tradition accessible to all devotees while preserving its authenticity and cultural significance.

Significance of Avani Avittam
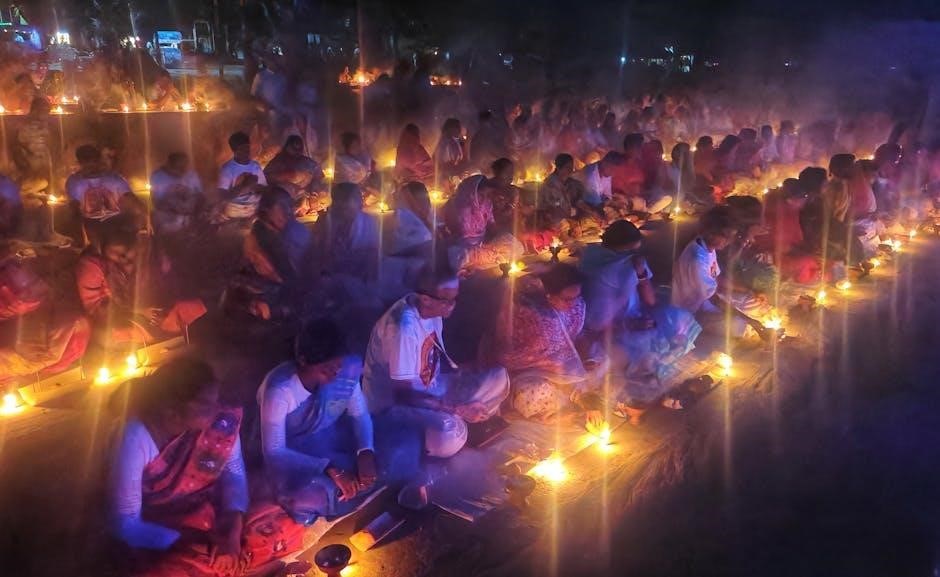
Avani Avittam‚ known as Upakarma‚ is a pivotal ritual in the Yajurveda tradition‚ observed on the full moon day of the Shravana month. It marks the beginning of the study of the Yajurveda and the renewal of the sacred thread‚ symbolizing spiritual rejuvenation. This day is considered auspicious for seeking divine blessings and cleansing past sins. The ceremony involves specific mantras and rituals‚ detailed in downloadable PDF guides‚ ensuring devotees can perform the rites accurately. Avani Avittam also emphasizes the importance of maintaining Vedic traditions and upholding one’s spiritual duties. It is a time for reflection‚ renewal‚ and strengthening one’s connection to their cultural and religious heritage‚ making it a cornerstone of Yajurveda observances.
Ritual Procedures and Mantras
The ceremony involves changing the sacred thread‚ chanting Gayatri Mantra‚ and performing specific rituals outlined in downloadable PDF guides for Yajurveda Upakarma 2023.
Step-by-Step Guide to the Ceremony
The Yajurveda Upakarma ceremony begins with Achanamam‚ followed by the removal of the old sacred thread. The participant then performs a symbolic cleansing with Dharba grass and water. Next‚ the Gayatri Japam is chanted‚ invoking divine blessings. The sacred thread is then replaced‚ symbolizing renewal. Specific mantras are recited during each step‚ as detailed in the PDF guides. Participants are advised to sit facing east and maintain purity throughout. The ceremony concludes with prayers seeking forgiveness and blessings for spiritual growth. Detailed instructions are available in Tamil and Sanskrit PDF resources‚ ensuring a seamless and meaningful ritual experience for all devotees.
Key Mantras and Their Meanings
The Yajurveda Upakarma ceremony includes several sacred mantras‚ each carrying profound significance. The Gayatri Mantra‚ a cornerstone of the ritual‚ is chanted to invoke divine wisdom and purity. Aachamanam mantras are recited during the initial purification rites‚ symbolizing self-cleansing. The Upakarma mantra itself seeks blessings for the renewal of vows and spiritual growth. Additional mantras‚ such as those for changing the sacred thread‚ emphasize detachment from past errors and commitment to future righteousness. These mantras‚ detailed in the PDF guides‚ are essential for maintaining the ritual’s sanctity and ensuring its proper execution. Their meanings underscore the ceremony’s focus on spiritual rejuvenation and devotion to Vedic traditions.

Required Materials for the Ceremony
The Yajurveda Upakarma ceremony requires specific materials to ensure its proper execution. A new sacred thread (poonool) is essential for the ritual‚ symbolizing spiritual renewal. Darbha grass and pavithram (a ring made of grass) are used for purification and offering prayers. Other items include a kalasha (ceremonial pot)‚ flowers‚ and prasadam (offerings) for the deities. A clean space with a seat made of darbha grass is prepared for the participant. Additionally‚ the PDF guides provide detailed lists of materials‚ ensuring everything needed is readily available. These resources also include mantras and step-by-step instructions‚ making the ceremony accessible for all devotees. Proper preparation of materials is crucial for the ritual’s sanctity and success.

Date and Time for Yajurveda Upakarma 2023
Yajurveda Upakarma 2023 is observed on August 30th‚ marking the sacred day of Shravana Purnima. This full moon day in the month of Shravana holds great significance as it symbolizes renewal and spiritual growth. The ceremony typically begins early in the morning‚ following the auspicious muhurat (timings) based on the location. Devotees are advised to refer to regional calendars or downloadable PDF guides for precise timings‚ as these may vary slightly depending on geographical location. The date and time are crucial for ensuring the ritual’s sanctity‚ as it aligns with Vedic traditions and the lunar cycle. This year’s Upakarma is particularly important for those following the Yajurveda‚ as it marks a commitment to Vedic studies and practices.

Sankalpam and Its Role in the Ritual
Sankalpam is a vital component of the Yajurveda Upakarma ritual‚ serving as a declaration of intent and purpose. It involves reciting specific mantras to formally announce the commencement of the ceremony‚ detailing the time‚ place‚ and reason for the ritual. This step ensures the participant’s mental and spiritual preparation‚ aligning their actions with Vedic traditions. The sankalpam also includes details such as the participant’s lineage and the specific Vedic branch they follow‚ reinforcing their identity and role within the tradition. In 2023‚ downloadable PDF guides provide precise sankalpam mantras in Tamil and Sanskrit‚ enabling devotees to perform the ritual accurately. This step is essential for the ritual’s sanctity and effectiveness‚ as it sets the spiritual tone for the entire ceremony.
Gayatri Japam Procedure
Gayatri Japam is a central ritual in Yajurveda Upakarma‚ involving the chanting of the sacred Gayatri Mantra. The procedure begins with purification rituals like Achanamam and wearing a pavithram (ring made of grass). Devotees sit facing east‚ chant the mantra 1‚008 times‚ symbolizing divine light and knowledge. The ritual includes sankalpam‚ stating the intent‚ and offerings to deities. PDF guides in Tamil and Sanskrit detail the steps‚ ensuring accuracy. This practice seeks spiritual purification and renewal‚ reinforcing Vedic values. The Japam concludes with Upasthaanam and Pradakshinam‚ marking the completion of the sacred vow.
PDF Resources and Downloads
Downloadable PDF guides for Yajurveda Upakarma 2023 are available in Tamil and Sanskrit‚ offering detailed rituals‚ mantras‚ and procedures. These resources ensure a smooth and authentic ceremony experience.
Availability of Tamil and Sanskrit PDFs
For Yajurveda Upakarma 2023‚ PDF resources are readily available in both Tamil and Sanskrit languages‚ catering to devotees’ linguistic preferences. These downloadable guides provide detailed rituals‚ mantras‚ and procedures‚ ensuring an authentic and structured ceremony. The Tamil PDFs are particularly popular among South Indian Brahmin communities‚ while the Sanskrit versions maintain the traditional Vedic essence. Both formats are accessible from trusted sources like vedabhavan and other spiritual websites. The PDFs include step-by-step instructions for rituals such as Gayatri Japam‚ Sankalpam‚ and the sacred thread-changing ceremony. They are designed to be user-friendly‚ allowing devotees to follow the rituals accurately. These resources are updated for 2023‚ ensuring relevance and adherence to traditional practices.
Benefits of Using PDF Guides for Upakarma
Using PDF guides for Yajurveda Upakarma 2023 offers numerous benefits‚ ensuring a seamless and meaningful ritual experience. These guides provide clear‚ step-by-step instructions‚ making it easier for devotees to follow the ceremony accurately. They include detailed mantras‚ Sankalpam‚ and procedures in both Tamil and Sanskrit‚ catering to linguistic preferences. The PDFs are easily accessible‚ eliminating the need for physical books and allowing devotees to refer to them anytime‚ anywhere. Additionally‚ they often include audio links for proper mantra pronunciation‚ enhancing the ritual’s authenticity. The guides are updated for 2023‚ ensuring relevance and adherence to traditional practices. Overall‚ PDF guides simplify the preparation and execution of Upakarma‚ making the ritual more accessible and convenient for all participants.